Study and practice taking readings as described in this instruction page. It is the basis for everything you will do with the NF4. All the instructions for operations like shaft matching, profiling, and spine finding will be given in terms of "readings", as defined on this page. So you should know this stuff like the back of your hand.
An NF4 "reading" is a single number, a measurement of load in kilograms (Kg). These notes tell how to take an accurate and relevant reading. Here are the factors that you have to assure in order to take the reading:
- Toggle board position: upper or lower.
- Beam length.
- Middle bearing block: bearings or V-notch.
- Tip position.
- Shaft rotation.
- Precision.
- Toggle board position: The toggle board should be in the lower position for most operations (e.g.- shaft matching, spine finding), but must be moved to the upper position for profiling.
- V-notch or bearings: For most operations, you will use the bearings, so the shaft can turn freely to its most stable position. But some operations require taking a reading at a specific shaft orientation. (The most obvious of these is spine finding by differential deflection, where you take readings at many specific orientations.) To keep the shaft in its orientation as you add load, set it in the V-notch instead of the bearings.
- Precision: You need to determine, for each reading, what sort of precision will satisfy you. For instance, when shaft matching, a precision of 0.03Kg is pretty good; it corresponds to a precision of 1cpm if you were measuring frequency. But, for a few purposes, a tighter precision of 0.01Kg is needed. One example is calibrating your NF4, but there are others as well.
Here is a step-by-step for taking a reading:
1.
Make sure the toggle board is in the proper position.
|
||||
2.
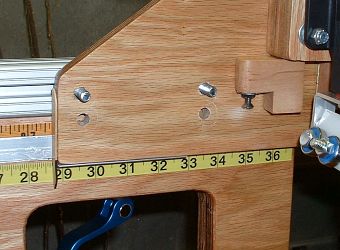
Set the beam length. You have two rulers you can use. Which you choose depends on the beam length you are trying to set.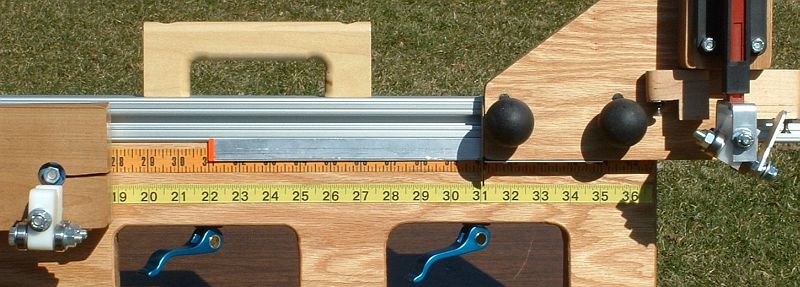 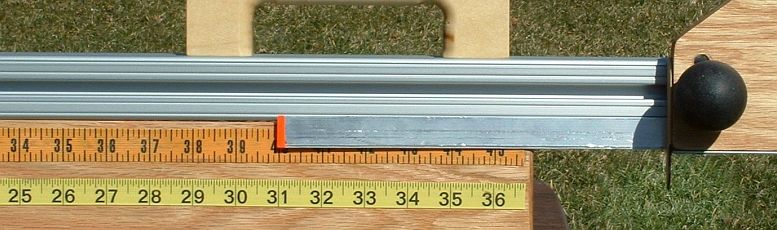 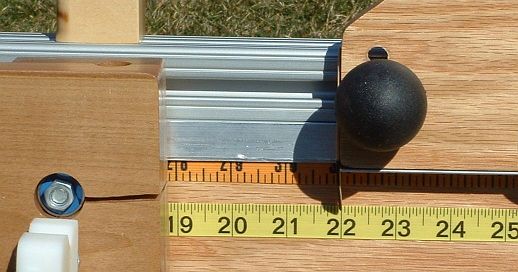 For
beam lengths shorter than 28", you must use the lower scale. The tip of
the wand is tucked behind the rotator board in the photo, which shows a
beam setting of 22", so the only useful indicator is the popsicle stick. For
beam lengths shorter than 28", you must use the lower scale. The tip of
the wand is tucked behind the rotator board in the photo, which shows a
beam setting of 22", so the only useful indicator is the popsicle stick.Note that the wand will not be able to slip behind the rotator board when the toggle board is in its lower position. The wand will bump into the rotator board pivot bolt and stop. But you only need such short beam lengths for profiling, and the toggle board is in the upper position for profiling. |
||||
 3.
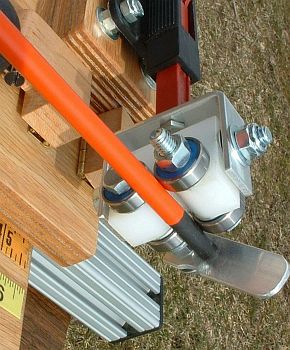
Insert the shaft. Place the toggle in the open (unloaded)
position, as shown in the photo. Slide the shaft into the bearings. 3.
Insert the shaft. Place the toggle in the open (unloaded)
position, as shown in the photo. Slide the shaft into the bearings.4. Be sure the shaft rests appropriately in the middle bearing block: bearing side or V-notch side. It would be used in the V-notch in a few circumstances, all of which involve needing to take a reading with the shaft in a specific, known orientation. |
||||
 5.
Position the shaft in the bearings. This is almost always
specified by where the tip is with respect to the tip stop. 5.
Position the shaft in the bearings. This is almost always
specified by where the tip is with respect to the tip stop.For instance, for profiling and calibration, the shaft should have the tip resting against the tip stop, as shown in the photo. For other operations, such as determining tip trim sensitivity, the tip would extend past the tip stop (with the tip stop rotated out of the way). In those cases, the position would be measured from the tip of the shaft to the inner edge of the tip stop. |
||||
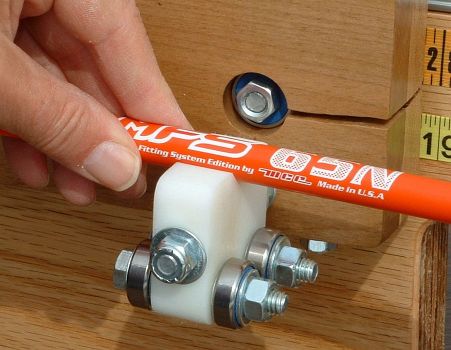 Also, if the shaft is in the
V-notch of the middle bearing block, rotate it to the desired position.
The photo shows the shaft resting in the V-notch rather than the
bearings. Also, if the shaft is in the
V-notch of the middle bearing block, rotate it to the desired position.
The photo shows the shaft resting in the V-notch rather than the
bearings.The shaft should not rotate in the V-notch, but an occasional shaft will. This is due to a combination of residual bend and a slippery coating. If it rotates, the friction can be increased with masking tape on the shaft where it meets the V-notch. |
||||
| 6.
Be sure the digital scale is on. There is a timeout that will
turn it off if it isn't used for a minute or two, so you may have to
turn it on even if this is not your first reading of the session. You must turn it on now. If you
discover it is off later in the sequence, back off to this step and
proceed again from here. Note that the scale will refuse to turn on if there is too much load on it when you press the "on" button. That is not the only reason the scale must be on by this point, but it is a good one. (But see notes below.) While you are here, be sure your scale is set to read in kilograms. |
||||
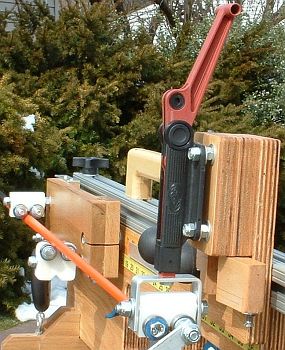
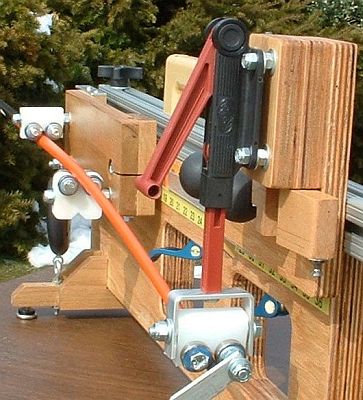 7. Load the shaft. Set the toggle to full load,
as shown in the photo. If the shaft is in the middle bearings (as
opposed to the V-notch), then rotate it a few degrees in each direction
and allow it to find a stable position. Now leave it in this orientation for
the rest of the steps. 7. Load the shaft. Set the toggle to full load,
as shown in the photo. If the shaft is in the middle bearings (as
opposed to the V-notch), then rotate it a few degrees in each direction
and allow it to find a stable position. Now leave it in this orientation for
the rest of the steps.8. Tare the scale. As soon as the reading on the scale stabilizes, press the "Tare/Zero" button on the scale. The reading should go to zero and stay there. If it does not, press it again. It may require a little practice to find a hand position that presses the button while supporting the scale body, so it consistently reads zero after you remove your hand and the scale settles. Yes, you must tare every single time you make a measurement. |
||||
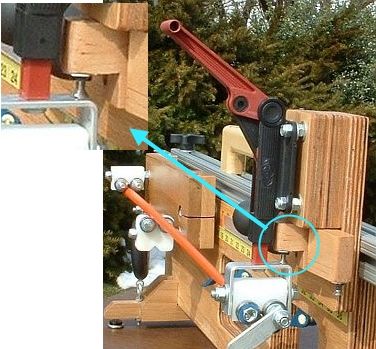 9. Back off to preload.
Flip the appropriate
toggle stop out, perpendicular to the toggle board. 9. Back off to preload.
Flip the appropriate
toggle stop out, perpendicular to the toggle board.
When the aluminum yoke is firmly against the stop screw (as shown in the photo), watch the digital scale. |
||||
| 10. Read the load.
Wait for the reading on the digital scale to
stabilize, and note the reading. It will be a negative number. If you
ignore the minus sign, that number is the load in Kilograms. |
||||
| 11.
Check the precision. If there was a previous reading, and that
previous reading agrees with this reading within the desired precision,
then you are done! For example, suppose:
If the readings disagree or if there was no previous reading, then continue. |
||||
| 12. Relax the shaft and repeat. Flip the toggle stop out of the way, and unload the shaft completely. Then return to step #7 and proceed from there. See note #1 below for a "streamlined" alternative. |

Notes:
- When you are getting good enough readings that you get agreement for the first two measurements just about every time, there is a quicker "streamlined" alternative to this procedure:
- At step #12, instead of unloading and repeating, tare the scale. (Press the "Tare/Zero" button, repeating until the scale reads 0.00.)
- Load the shaft fully and read the measurement. It should agree with the previous measurment.
- As soon as you have recorded the measurement, unload the shaft; see note #2.
- Do not leave the shaft fully loaded for any longer than is
absolutely necessary. Some shafts will take a "set" (at least
temporarily, for anywhere from minutes to hours) if loaded for more
than a few seconds.
- During the steps of loading and unloading, keep an eye on the shaft tip, to be sure it is still in the proper place (for instance, firmly against the tip stop). Sometimes rotating the shaft can cause it to drift away from the stop.
- If
you absolutely, positively have to turn the scale on under load --
under enough load that it doesn't want to start up -- there is a way to do
it. But do not do this routinely; it is bad practice and could lead to
inaccurate readings. With that caveat, here's the magic trick; don't
depend on it too heavily.
Press down on the rear of the rotator board, so the weight of your pressure is taking weight off the scale. With the other hand, turn on the scale. Keep pressure on the board until the scale is completely on and showing a reading.
Last modified by DaveT - 8/14/2005