How to Match Shafts - 1
Dave
Tutelman -- November 25, 2005
Matching a set of irons
The steps involved are:
Record stiffness of each raw shaft
 Take a reading to measure the stiffness of each shaft, with the shaft tip against the tip stop as shown in the photo. Take a reading to measure the stiffness of each shaft, with the shaft tip against the tip stop as shown in the photo.
Record the reading, and be sure to have a way to associate the
recorded reading with the specific shaft. That means that each shaft
must have a unique marking. That marking cannot be the designated club
(e.g.- "8-iron") -- at least not yet. We will assign shafts to clubs
based on the stiffness we measure.
I usually put a letter (A, B, C, D, E,...) on the butt of each shaft, and pair the measurements with the letters.
|
In addition, I usually record the gram weight of
each shaft. When sorting and assigning shafts, I use the weight as a
secondary sort. That is, shafts with the same stiffness are placed in
order of increasing weight. But, if the shaft weights are all within
about 4 grams of each other, this is a pretty small effect and you can
safely ignore it.
|
Here's an example of a table in which to keep your data. It is a
snapshot of an Excel spreadsheet that does the calculations. You can download and use the spreadsheet to aid with your own shaft matching.
The spreadsheet as downloaded will be initialized
with the same sample values as in this tutorial. Overwrite those values
with what you measure.
Sort the shafts by their raw stiffness, and assign them to clubs
You now have the raw stiffness and perhaps weight of each shaft. Sort the shafts:
- In order of increasing stiffness.
- Where shafts have the same stiffness, in order of increasing weight.
 If you are using the Excel spreadsheet, here are the steps to do the sorting: If you are using the Excel spreadsheet, here are the steps to do the sorting:
- Using the cursor, select (highlight) the portion of the
spreadsheet showing in the figure below. That would be the three
columns "Label", "Weight", and "NF4 Raw Load". Highlight them for as
many rows as you have data filled in, and be sure to include the header
(title) cells.
- Go to the "Data" menu and click on "Sort". That will bring up the Sort dialog box as shown.
- Be sure the box says that there is a "Header Row".
- Set the dialog box to sort first by "NF4 Raw Load" (ascending) and then by "Weight" (ascending).
- Click "OK", and the table will be sorted.
|
Here's the table after sorting the shafts.
A couple of things to note here:
- This is where the label you added to the shaft (A, B, C, D, E,...) comes in handy. You won't lose track of which shaft is which.
- There are two shafts (C and A) with a raw stiffness of 5.34 Kg. The one that weighs less is placed earlier in the table.
At this point, you can assign them to the irons you are going to build.
Put the softest shafts in the longest clubs, and the stiffest in the
shortest. Let's assign our sorted set of shafts to a "standard" irons set: 3-iron through pitching wedge.
So the 3-iron will be built from the shaft we labeled "
G", the 7-iron from shaft "
A", etc.
Find the tip trim sensitivity
We will measure the tip trim sensitivity of one of the shafts, and
assume it is representative of all the shafts. This will be a good
assumption for some models and not so good for others. But it won't
matter, as far as the shaft matching is concerned. The only effect it
will have is how quickly we zero in on that match.
Select a shaft that is most likely to be representative of the shafts
being used. That is likely to be one of the middle rows of the table.
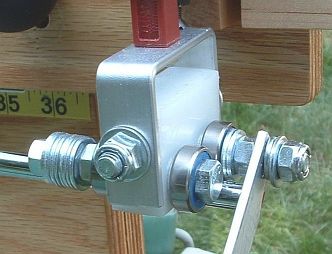
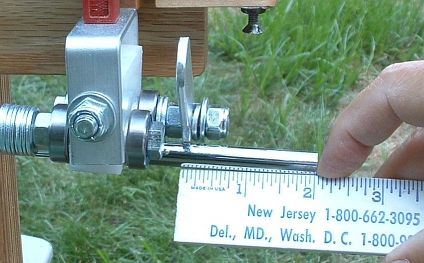 Place the shaft in the NF4, and repeat the former measurement (just as a check). Then slide the shaft so that 2" of tip is
exposed beyond the previous measurement. See the photo, where the
distance from the inside of the tip stop to the tip of the shaft is
exactly 2". (If you are using millimeters instead of inches, expose 50mm of tip.) Place the shaft in the NF4, and repeat the former measurement (just as a check). Then slide the shaft so that 2" of tip is
exposed beyond the previous measurement. See the photo, where the
distance from the inside of the tip stop to the tip of the shaft is
exactly 2". (If you are using millimeters instead of inches, expose 50mm of tip.)
Record that reading.
(There are ways of mounting a ruler to make it easier and faster to extend the tip a known amount. Here are a few...)
|
TTS = (Load2inches - LoadTip) / 2
On the spreadsheet, all you have to do is enter the two load readings (the green numbers), and it will compute the TTS for you.
Choose
a baseline shaft and assign a load to it
To match
the set of shafts, choose one shaft to which the other shafts will be
matched. It is usually a good idea to start with the softest shaft (the
one going in the longest club) as the baseline, since you can be
relatively sure that it will be physically possible to get the right
trim for all the clubs before you run out of shaft to trim. (If you
started with a short club and worked backwards, the tip-trim for the
longest club might turn out to be negative; you can't achieve the flex
you need in order to match the set.)
Note that I said "relatively sure." If
the raw shafts have some really large stiffness differences one to the
next, you still might not be physically able to achieve your trim. But
shafts with that big a mismatch are really poor quality. On this
subject, I often order a few extra shafts so I can ignore "outliers"
that seriously mismatch the others. But there are shaft manufacturers
whose quality control is good enough that I don't have to do this if I
order their shafts. One of the advantages of dealing with high-quality
suppliers is that you don't need to over-order to be sure you have
enough good shafts.
Note that the Excel spreadsheet requires
the baseline shaft to be the softest shaft, which has been assigned to
the longest club. If you choose another shaft for the baseline, you'll
have to do some hand computation -- at least for the target load -- instead of just plugging things into
the spreadsheet.
For our sample data set, we're going to use the 3-iron (shaft
"G") as our baseline shaft, because it is the softest one we have. We
will assign a target deflection to that shaft as trimmed. For this set,
let's say we're going to leave the 3-iron untipped, so its target
deflection will be exactly what we measured for the raw shaft: 5.30Kg.
Choose a target slope
In simple "cut and
glue" clubmaking, the slope is determined by the shaft and the tip trim
increment (such as a half inch per club). If you frequency match, then
you trim to a frequency slope as measured by a frequency meter.
But we are matching with an NF4, so we need to express the slope in terms of NF4 load, not
frequency. There are quite a few ways to approach this. For example:
Experience
|
Once you have experience with the NF4 and the models of shafts you use
all the time, you will have some "stock" slopes. You will pick the one
you know will work, because you've done it before. (But, if you're that
advanced, you're probably not reading these instructions. Just letting you know
what you can look forward to.) |
Manufacturer's
trim schedule
|
You can go with the manufacturer's recommendations, and use the NF4 to
enforce that the slope is followed smoothly and accurately. The manufacturer usually provides
tip-trim instructions, recommending an increment something like 1/2"
per club or 1/4" per club. Let's go through an example of this:
- Suppose the manufacturer says to use 1/2" per club.
- We
know how much of a load difference our target shaft
has with a 2" trim; it's the difference between the last two readings
we took. Doing some arithmetic, we see that the difference was 0.63.
- If a 2" trim gives a 0.63 load difference, then a 1/2" trim should give a quarter of that, a 0.16 load difference. So let's pick a target slope of 0.16 Kilograms per club.
|
Frequency
|
You can take a frequency approach. Let's go through an example:
- Suppose you want to
build the clubs to a "Brunswick slope" of 4.3 cpm per club. Other
references have shown that the shaft trim contributes about 2.5cpm to
the slope, and length and head weight account for the rest. So we want
a tip trim increment that contributes 2.5cpm per club.
- If we know that a cpm is equivalent to X Kg of NF4 load, then we can convert that into an NF4 slope. For instance, suppose the mysterious X were 0.05 Kg. (We're still working on this, but we know it is between 0.03 and 0.06 Kg per cpm.) Let's do the conversion, assuming 0.05 Kg per cpm.
- 2.5 cpm per club times 0.05 Kg per cpm gives a target slope of 0.125 Kilograms per club.
|
So now we have a target slope for the NF4 readings. For the remainder of our example, we will use 0.15 Kilograms per club as that slope.
If you are using the spreadsheet, enter this target load increment in
the appropriate blue cell, and enter the baseline target load (from the
previous section) in the other blue cell.
Compute a target stiffness for each shaft
The next step is to determine the stiffness (that is, the target load
on the NeuFinder) that you want for each shaft. This is easy, because
you have already chosen:
- A baseline shaft with a target load.
- A target slope (increment) for the load.
So all you have to do is space the loads from one club to the next by
the amount of the target increment, starting at the baseline shaft. If
you are using the spreadsheet, it has already done the calculations for
you. The target load column is filled in with numbers starting with the
baseline load of 5.30 for the 3-iron and going up by our target slope of 0.15 per club.
The Target Load is what you want to get from the NF4 after you have
trimmed the shaft. That is the end goal of the whole matching procedure.
You will find it by trial and error, which can get tedious. But the
good news is: you can make a very good guess for the first trial point.
So the number of trials it will take to find the trim will be very
small. (In my first attempt at matching shafts using this procedure,
six out of seven shafts matched the first trial -- no error. The other
shaft had a small error, but matched on the second trial.)
In the next section, we will learn how to "guess" or estimate the tip trim, and use that
estimate as the first trial point.
Estimate the tip trim
We already have the raw load and target load for each shaft, and a
pretty good estimate of the tip trim sensitivity for the shaft. From
these, we can calculate how much tip trim we should need. Later, we'll use this estimate as a starting point to measure the shaft for the actual trim point.
Computing the amount of tip trim we should need is pretty simple. We know:
- What the load is on the shaft with no tip trim. (The raw load.)
- What load we want on the shaft. (The target load.)
- How much the load changes per inch of tip trim. (The TTS.)
So the formula for trim in inches is simply:
Trim = (TargetLoad - RawLoad) / (TTS)
If you're using the spreadsheet, you already have these numbers in the "Est Trim" column, as seen in the example below.
This
should give the amount of tip trim we need. But remember, we didn't
measure the actual TTS for each shaft. We measured one shaft and
assumed they all have the same TTS. So we still have to measure each
shaft to be sure we get the right target load when we trim. But now we
have a very good place to start measuring: the estimated tip trim.
Use the NF4 to find the actual tip trim
We find the actual tip trim for each shaft as follows:
- Place the shaft in the NF4, with some tip extended beyond the tip
stop. Initially, the tip should extend by the estimated trim for that
shaft. For instance, for the 6-iron shaft in our example
- We should be using the shaft labeled "C".
- The tip should extend 1.30" beyond the left edge of the tip stop.
- We are trying to position it so the NF4 load is the target load of 5.75Kg.
- Measure the load on the shaft. Call that measured load "L".
- If L is the target load (or close enough to it, generally within 0.03Kg), then we are done. Mark the shaft at the left edge of the tip stop and trim it there.
- If L is not equal to the target load, release the tension on the shaft and slide it a little in the bearings:
- If L is less than the target load, slide the shaft to the right.
- If L is more than the target load, slide the shaft to the left.
- Return to step #2 and continue.
How effective is the estimation? In order to test the matching
procedure, I went through it with eight original Balistik shafts. I
used the spreadsheet to estimate the tip trim from the measurements.
Then I found the actual trim points, starting from the estimated
points. The estimates were very effective. Of the eight shafts:
- One, the baseline shaft as in the example, was left untrimmed.
- One started 0.04Kg off, and needed about an eighth of an inch movement to find the target load on the second iteration.
- The other six were all within 0.03Kg of the actual target load when set at the estimate. They needed no second iteration.
Even so, do not just trim to the spreadsheet's recommendation
without checking the load, especially if you must trim considerably
more than 2". I went through the procedure again with the same Balistik
shafts, but with a larger initial trim. This is realistic because the
Balistik is a combo shaft. You can get any flex out of it from a soft
A-flex to an S-flex, simply by varying where you start your trim. In
this case, my trims were between 3.5" and 6", but my estimate of Tip
Trim Sensitivity was based on trims less than 2". Since the TTS can
vary -- on most shafts, the TTS increases as you trim closer to the end
of the parallel section -- the Estimated Tip Trim column is likely to
recommend too much trim. In this case, the recommendation was between
1/4" and 5/8" too much. It took at least two and usually three
iterations to find the correct trim.
So by all means do check the load with the NF4 before you actually trim the shaft.
Last modified by DaveT - 12/27/2005