Rotator Board

Dan Neubecker with Dave Tutelman -- March 19, 2005

The rotator board is the component where accuracy of the construction, especially the location of the holes, is most critical to calibration of your NF4, so measure at least twice for each dimension.

Basic assembly

First cut the main front board with the grain running lengthwise.  You can also cut the rectangular back support pieces at this time.  The grain for these will run lengthwise, or 90º to the grain on the front board, when assembled.

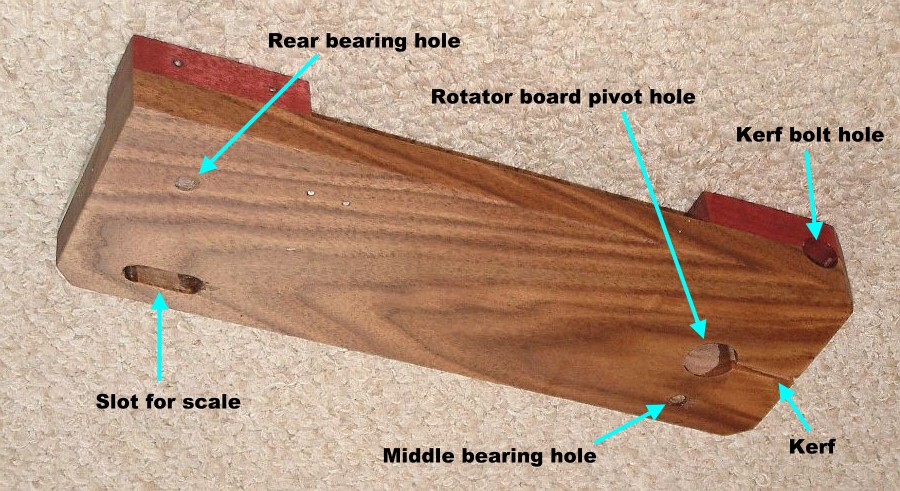
Cut the notch out of the back piece at the rear of the rotator board.  The precision of this cut is not critical; it only acts as a recess for the stabilizer bearing to ride along the back of the rotator board.  It is probably easiest to make this cut with a table saw, cutting alternately from each direction.

With the three pieces cut, glue and clamp them together with wood glue and set them aside to dry.  Periodically check them and wipe off excess glue.

Holes and slots

After they have dried, proceed, with your utmost precision, to mark the locations for the holes on the front of the rotator board.  It is especially critical that the dimensional relationships between the 3 holes and the slot front to back in the rotator board are according to plans.  Use the starter hole technique explained earlier.

Here is a roadmap to the rotator board, before you start to drill.

The major holes and slots in the rotator board.

The assembled, completed rotator board

The rotator board is pivoted on bearings extending forward from the backer board. The bearings fit into the pivot hole. Tightening the kerf bolt tightens the pivot hole, securing the bearings.

The rotator board dimensions that are critical to the precision of the NF4 are the hole positions, as shown in the photo:
  • The middle bearing hole must be directly below the rotator board pivot hole, and the distance below must be precise.
  • The rear bearing hole must be positioned precisely (both vertically and horizontally) with respect to the middle bearing hole.
  • The slot for the digital scale must be at the same vertical level as the middle bearing hole.
Mark these critical points on the board with a fine center-punch or nail, before you begin to drill any of the holes.


Bearing arm holes

Drilling the holes for the bearing arms takes several steps.  Start by drilling small pilot holes (1/16” to 3/32” bit), from the front, completely through the stock. The pilot holes must be smaller in diameter than the pilot point of either of the larger drills you will use later (the counterbore and the through-bore).  These small holes can then be used to locate the center of the larger bit for you use to do the counterbore from the backside.  Both of the bearing arm locations require a counterbore.  Complete the counterbores using a forstner bit.  Then drill the 5/16” holes through from the front side, using the small pilot holes as a guide.

Pivot bearing

Drill the 7/8” pivot bearing hole entirely through the rotator board.  Again, a forstner bit is the best way to bore this hole.  Next, make the saw kerf cut into the side of the pivot bearing hole from the front edge.  This is best done with the rotator board held vertical.  The saw cut will remove a kerf about 1/8” wide, which allows the rotator board to be clamped down over the pivot bearings.

In order for the rotator board to clamp down over the bearings, you need a bolt for this purpose.  The plans call for a ¼”x4” bolt to compress the rotator board around the bearings.  The bolt sits in a counterbore into the top of the rotator board.  The counterbore should be created first, using a drill press.  Next, drill the ¼” hole all the way though the center of the rotator board from topside.  I recommend the use of drill press for this; however, many drill presses do not have the 4” of travel necessary.  Mine has a 3-1/2” travel, so I was able to go most of the way through.  I then used a ¼” blade style bit, which is well over 4” long, in my hand electric drill to finish this hole.  The first part of the hole acts as a guide for the bit during the last part, making the drill press unnecessary for the remainder.

Slot for upper scale anchor

Fashion the 5/16” slot at the lower left of the rotator board.  This will take several steps.  First, I recommend you carefully mark and drill a 5/16” hole for each end of the slot.  Then mark and drill, as closely together as possible, additional 5/16” holes to be drilled through to the back.  At this point you will have a string of 5/16” in a row, spaced very closely together.

Now you need to remove the material between these holes cleanly.  I started with a saber saw and cut a little out as best I could, but stayed well short of the 5/16” width over the length of the line. 

To get a clean, straight line the full length of the slot, I then used a ¼” parallel side router bit, that I set to go just a little past halfway through the piece.  If you use a router table, router and parallel side bit, you should be able to fashion a very clean 5/16” slot.  Then turn the piece over to complete the backside half of the slot. 

Be careful not to let the width of the slot get too much bigger than 5/16”. The critical thing is that the slot be wide enough for a carriage bolt to slide, but still narrow enough to keep the carriage bolt's square shank from turning.

Aluminum strips

Install the two aluminum pieces to the rotator board.

First, install the stabilizer bearing base.  This piece of aluminum stock must fit in the notched area of the rotator board.  If you chamfered or rounded the corners, you may have to grind off some of the rectangular aluminum piece to fit into this area.  Once this piece is adjusted to fit, it is installed with contact cement only.
The second aluminum piece to be installed is the rotator board stop base.  This piece is screwed down through the top edge of the rotator board with two 1” pan head Phillips wood screws.  I recommend you drill pilot holes for the screws so the wood is less likely to split and the screws are easier to get in.  You can also include contact cement on this part if you wish to ensure an even stronger bond.


Last modified 8/21/2005 by Dave Tutelman